An IP address, or Internet Protocol address is a numerical ID assigned to each device in a computer network. It is used to identify and address devices in the network.
In most cases, IP addresses are dynamically and automatically assigned in LANs (Local Area Networks) and broadband networks which is called DHCP (Dynamic Host Configuration Protocol), to avoid the administrative burden.

Why Static IP Address?
Sometimes you may want to assign a static IP address to one or more of your devices for some reasons. For example, I assign static IP addresses to some of my devices on my WiFi network to manage QoS rules – i.e. to control the internet bandwidth (speed) given to different devices (hope my wife won’t read this!). Here is how to set static IP address in your different types of devices:
1. For Your Windows PC
1. Go to Control Panel -> Network and Internet -> Network Connections.
2. Right click on the network (Ethernet, Wi-Fi or whatever) you are using and click ‘Properties’. It will open a Properties window.
3. In the ‘Networking’ tab, double click Internet Protocol (also called TCP/IP protocol) Version 4 or 6 whichever you are using from the list.
4. It will allow you an option to manually enter the IP address.
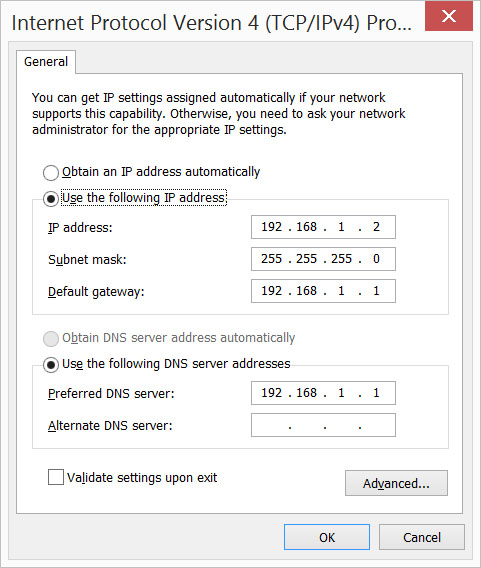
4. In the IP address box, enter the preferred IP address you want to set for the device- E.g. 192.168.1.2, 192.168.1.3 – up to 192.168.1.255.
Please remember to assign a unique IP address for each of your devices.
5. Enter the Subnet mask: 255.255.255.0.
6. Default gateway: Your network router or server which passes traffic from the local subnet to the devices on other subnets. In most cases, 192.168.1.1.
7. DNS server: Enter DNS (Domain Name System) server address same as the default gateway. Click ‘OK’ to all opened windows and you are done!
2. For Your Apple/iOS Devices
For your Apple/iOS devices (Mac, iPhone, iPad or iPod), follow these steps:
1. Go to Settings -> WiFi. Switch on WiFi and Connect to your network and tap it to go to its settings.
2. You will see 3 tabs for IP Address settings. Select ‘Static’.
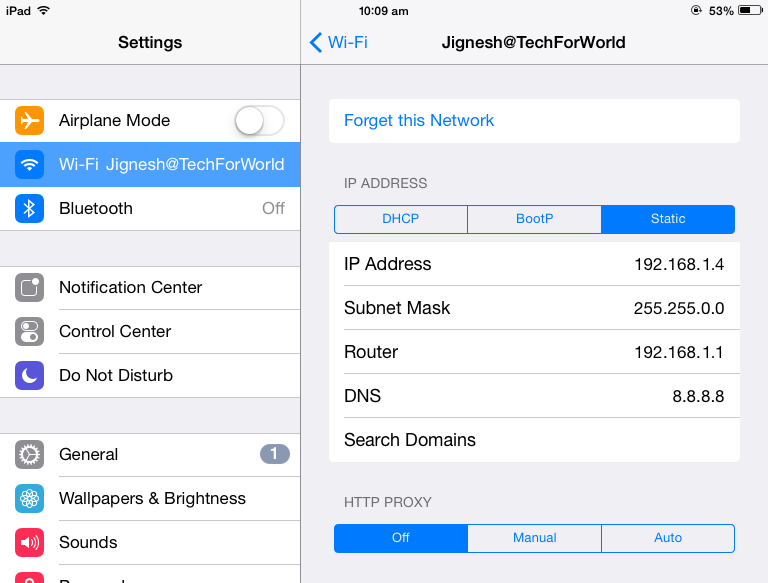
3. Enter the preferred unique address in the IP address box.
4. Subnet Mask: 255.255.0.0
5. Router IP: E.g. 192.168.1.1
6. DNS: Enter 8.8.8.8.
3. For Your Android Devices
For your Android smartphone or tablet also, this setting is easy.
1. Switch on Wi-Fi and connect your network.
2. Tap and hold the connected network for 3 seconds and it will open a menu. Select ‘Modify network config’.
3. It will open network settings.
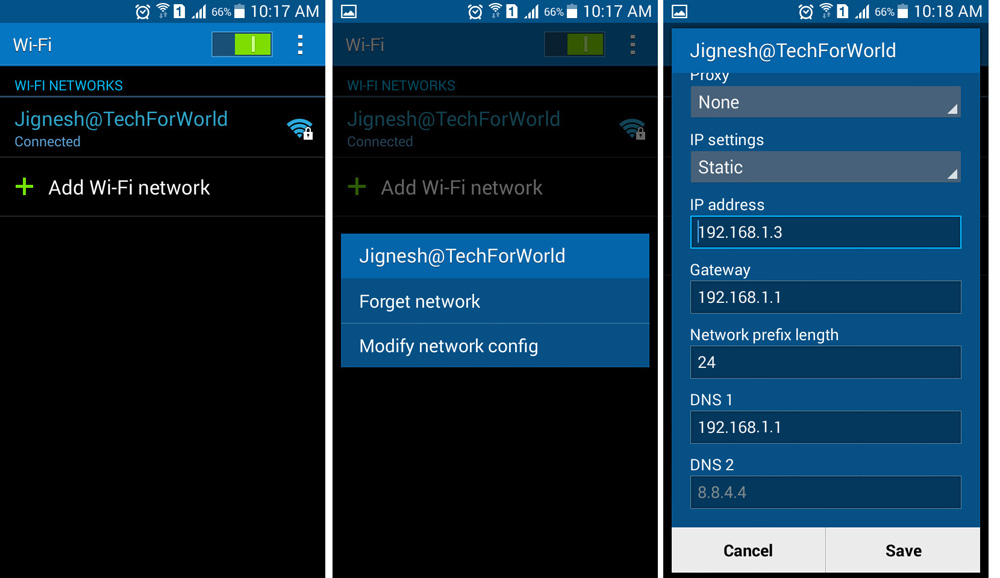
Click the image to enlarge
4. Enter the preferred unique IP address.
5. Gateway: Your server or router IP. E.g. 192.168.1.1.
6. DNS 1: Your server or router IP. E.g. 192.168.1.1.
7. Click ‘Save’ and you’re done!
Leave a Reply